Find the steps and file formats for your project, from halftone settings to print and mesh exports.
No chapters match your search. Try a term such as “ink”, “layer” or “relief”.
Install or update
Download Orion4D-Halftone-Studio-V2-Windows-x64.zip from GitHub Releases.
Extract the archive to a folder where you have write access and run Orion4D-Halftone-Studio-Portable-2.0.0.exe. The app is portable.
Keep models/ next to the executable for offline background removal and depth map generation.
In General Settings, choose the language, an interface scale from 80% to 130%, and the export folder. Click Save settings.json.
To update, extract the new version to a separate folder. Copy across any presets, fonts, SVGs and preferences you want to keep. Open your .orion4d projects from the File menu.
Orion4D Halftone Studio is free to use, with optional donations. The package includes the V2 licence and third-party notices.
Switch modes in the top toolbar. Settings are on the left, the preview is in the centre and layers are on the right.
In Single Image, click Open / Replace Image and choose your source.
Choose Vector Dots for shapes you can export as SVG, or Pixel Dots for raster output.
Adjust spacing and shape, then use Before / After to compare the result with the source.
Choose an output format and size at the top of the window, then click Export. Save the document to keep your settings.
Input and output sizes
Input size sets the working dimensions before processing. Keep the original size, choose a percentage from 25% to 200%, or set the longest side to a fixed value from 1,024 to 8,192 px. Resizing preserves the aspect ratio and transparency. The document retains the original source image.
Export at the working size
Choose Original as the output size to use the working input dimensions. For different dimensions, set a fixed length for the longest side or choose a print size. Resized inputs are capped at 8,192 px on the longest side.
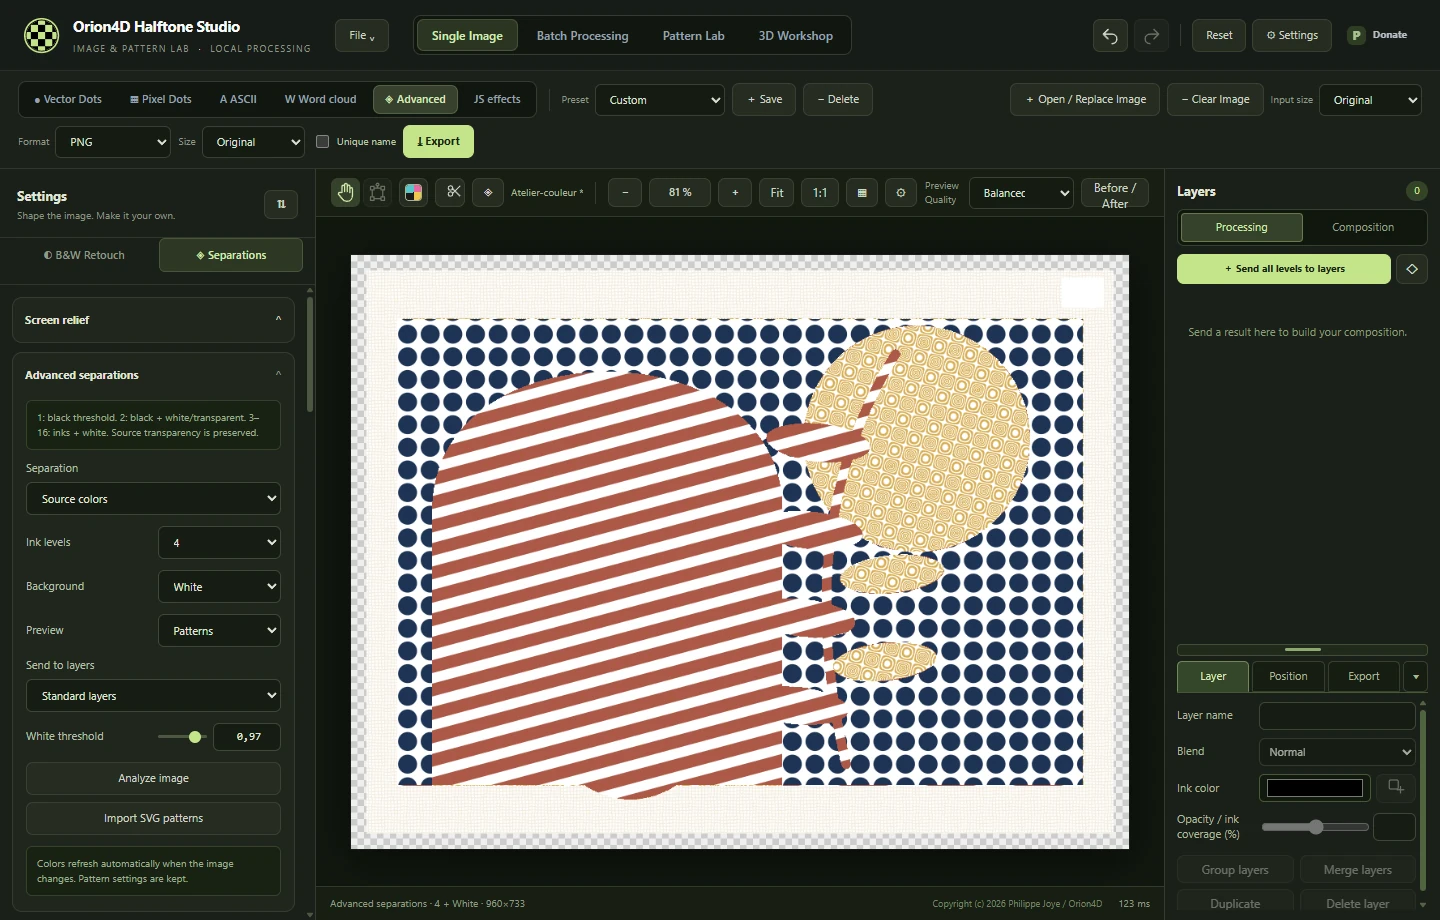
Single Image view in Advanced mode. The input size is in the top toolbar.
Retouching and depth
Use B&W Retouch to prepare the tones for a monochrome halftone. Check that shadows and highlights retain the detail you want to print.
Background removal uses local models. Adjust the mask threshold and edge softness, then export the cut-out as a PNG.
In Screen relief, generate or import a depth map and enable relief. Strength, direction and smoothing control how the pattern bends. The thumbnail shows the depth map even when the canvas displays the processed image.
In Normal Map, generate normals from depth or import a normal map PNG. Enable their influence to guide how the halftone maps onto the surface.
Vector and pixel dots
Vector Dots
Set the grid, spacing and dot shape. The Vector workshop also offers continuous hatching, adaptive stippling and Bézier outlines. Analysis precision sets the geometry. Increasing the export resolution renders it in finer detail.
To use a custom SVG shape, place it in svg_dots/ next to the executable. Select the custom SVG style and reload the shape list.
Pixel Dots
Adjust sampling, raster processing and pattern generation. Compare patterns at the intended export size. PNG preserves the raster output. Select 1-bit RGB for a thresholded result.
Print and inks
In Advanced → Separations, choose Print and select CMYK, two-colour, three-colour or multi-ink. Multi-ink accepts four to eight inks and can calculate the mapping or import an output ICC profile.
The multi-ink palette starts with CMYK, orange and green. Spot-colour swatch libraries offer mixed, pastel, complementary and tertiary colours.
Set the Print Size so that the screen ruling matches the physical dimensions.
Set a global pattern, spacing and ink coverage. Open an ink to adjust its pattern, curve and angle. Use Reset all curves to restore a linear ink response.
Compare the screened patterns with the flat separations, then send the levels to layers or export the separations.
Screen ruling and spacing
When screen ruling is linked, changing one field updates the other. Spacing in millimetres is 25.4 ÷ lpi. At 40 lpi it is 0.635 mm. For an FM stochastic screen, adjust the microdot size.
ASCII and word clouds
ASCII
Choose a style and character set, then adjust the columns and layout. Use PNG for the rendered image, SVG for glyph outlines or TXT for regular grid styles.
Word cloud
Import text or a word list in TXT, CSV or JSON format. Adjust word weights and choose a silhouette mask or photo analysis. Photo / portrait is a starting point for a dense composition that uses the image colours.
Import a TTF or OTF font from the typography panel, or place it in fonts/. SVG exports glyphs as outlines.
Layers and export formats
Send result to layers adds the render to the Layers panel. Switch to Composition to stack, move or recolour inks. Alt-click the visibility button to isolate a layer. Alt-click again to show the layers.
Format
When to use it
PNG
Raster image, composition or ink layer, depending on the mode.
SVG
Paths from vector, ASCII or word cloud modes.
PDF / PSD
Compositions, print handoff or separations, depending on the export options.
OBJ / STL
Meshes from the 3D Workshop. Dimensions are in millimetres.
Before exporting a plate, check the physical size, pixel dimensions and background. Save an editable copy in a .orion4d document.
Print check helps verify fine detail, white underbase and registration. Supported formats can produce black films, negatives or mirrored plates.
Pattern Lab
Open Pattern Lab to create an adjustable pattern. Use the Pattern catalogue to browse and compare patterns before applying one to a halftone or ink.
Save combinations you want to reuse as presets or workshop profiles. The portable version stores its local libraries in patterns/ and svg_dots/.
3D Workshop
Open the workshop from the main toolbar. Choose a creation mode and adjust the material, lighting and view before choosing an output.
Creation
Starting settings
Print materials
Simulate foil, varnish or embossing. Map the halftone onto a sphere, cylinder, curved sheet or relief. Adjust lighting, shadows and screen-space ambient occlusion (SSAO).
Sculpted halftones and word volumes
Set the grid or word cloud, then adjust shape height. Check the base and view before exporting.
Image to mesh
Set the width, relief height and base thickness in millimetres. Use an image or depth map to determine the heights.
Lithophane
Set minimum and maximum thickness, the curve and absorption. Use the stepped test piece to calibrate the filament for your lighting.
Two-image sculpture
Compare views A and B and export a folding template as a PNG with cut and fold guides. Print it at 100%.
Layer slicing
Set the thickness and spacing between layers, then prepare assembly templates.
Directional engraving
Cut grooves whose width and depth follow the image tones. Try Match source image and use a low-angle light to reveal the relief.
3D anamorphosis
Arrange dots or words in space and save the reference view with the 3D preset.
Export a still image as PNG or a mesh as STL or OBJ. A textured OBJ comes with its MTL file and textures in a ZIP. Extract them together. Workshop presets are stored in presets/3d/.
Animation
Choose rotation, an optical effect or an effect that assembles and disperses the image. Add, move or remove keyframes on the timeline and vary the framing and zoom. Export as GIF or MP4 according to the scene settings.
JS effects
Select JS effects, then load an example or paste a script.
Click Test and apply. Live preview runs the test again shortly after you change the code or a setting.
Add a description and click Save to keep the code and script values with the preset.
Declare sliders, numeric fields, tick boxes, lists, colours and text fields in an @orion4d-params JSON block. The synchronous function receives the values in params and updates the RGBA buffer in place. The local engine enforces time and memory limits.
Example · adjustable threshold
/* @orion4d-params
[
  {"key":"threshold","type":"slider","label":"Threshold","min":0,"max":255,"step":1,"default":128}
]
*/
function effect(pixels, width, height, params) {
  for (let i = 0; i < pixels.length; i += 4) {
    const tone = 0.2126 * pixels[i] + 0.7152 * pixels[i + 1] + 0.0722 * pixels[i + 2];
    const gray = tone >= params.threshold ? 255 : 0;
    pixels[i] = pixels[i + 1] = pixels[i + 2] = gray;
  }
}
To install a compatible JSON preset, copy it to presets/javascript/ next to the executable and restart the app. In a single-ink layer, dark pixels add ink and white stays transparent.
Local MCP
In General Settings → Local MCP, enable MCP and copy the configuration into your client. Keep Orion4D Halftone Studio and the document open. The client uses --mcp-stdio and communicates with the app locally.
orion_get_document reads the mode, size and editable settings.
orion_list_presets lists presets and orion_apply_preset applies a saved preset.
orion_set_mode changes the 2D mode and orion_update_settings adjusts processing and inks.
orion_test_javascript tests a script on the source. orion_save_javascript_preset saves the applied script.
orion_preview returns a PNG preview. orion_export_png exports to the folder set in Orion4D Halftone Studio and orion_undo undoes the last change.
For 2D operations, return to the Processing view and close the 3D Workshop. If you move the executable, copy the configuration again to update its path.
Batch processing and presets
Prepare a result with a representative image and save the settings as a preset. Switch to Batch Processing, choose the source and destination folders, and select the input and output sizes before starting the batch. General Settings lets you preserve subfolders and use unique export names.
Presets are grouped by mode in presets/. When moving the portable version, keep the libraries and local models with it.
Troubleshooting
Background removal or depth unavailable. Check that models/ and its subfolders are next to the executable.
Slow animation export. Try a shorter duration, lower frame rate or lower output resolution.
Old executable is locked. Close Orion4D Halftone Studio and quit any MCP clients using the executable. Copy the MCP configuration from the new version before restarting them.
When reporting a problem, include the Windows version, rendering engine, input and output sizes and steps to reproduce it. Report an issue on GitHub